Showing posts with label Nail art. Show all posts

Wednesday, 19 December 2012

Artsy Wednesday - Christmas Edition

This year I bought a bunch of Xmas lights to decorate the house. My kids love them.

My nails this week are an attempt at recreating the lights. Little hanging strings of multi coloured lights twinkling in the night.


I wish I had done the lights a bit smaller, but time has not been on my side this week.

Merry Christmas all.


Wednesday, 12 December 2012

Artsy Wednesday - Glitter Gradient

Wow life is busy at this time of year! Lots of parties and end of year activities happening. Work, family, kids, friends, shopping. Sometimes there just isn't time for nail fun. Last week I missed the tape manicure but I've managed to put something together for this week.

I don't think there are many nail junkies who don't like glitter. There are so many beautiful offerings from both major and independent brands.
 

This week I've used a black base and topped it with three polishes from Australian brand Femme Fatale. At the tips I have Hydraxia, then Glinting Lodestone and Eternium Dreams. A nice thick coat of Seche Vite gave it all a nice shine.
 

Check out the other glittery manis from the Artsy Wednesday girls.


Wednesday, 28 November 2012

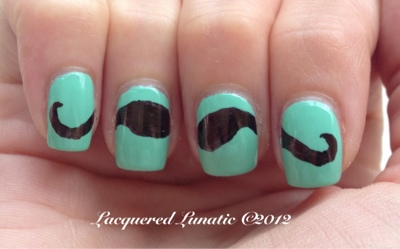
Artsy Wednesday - Movember

The men I work with have been right into Movember this year. It's been like working on the set of a bad 70s porn movie. I will be very glad when they all shave as I have been finding it hard to take them seriously when they look so silly.

Today I've used Models Own - Jade Stone as my base colour and a permanent marker for the stache.


Check out the other Movember Manis from the Artsy Wednesday girls


Wednesday, 21 November 2012

Artsy Wednesday - Jelly Sandwich

This week for Artsy Wednesday we are trying the jelly sandwich manicure.
 
 A jelly sandwich manicure is when you put a layer of glitter polish in between two layers of a jelly polish. I generally don't tend to wear this style of mani as I like the shininess of the glitter on it's own. I also don't own a lot of jelly polishes.

 
For this manicure I used two coats of Ulta 3 - Frog Prince, one coat of Glimmer by Erica - Punky Patty and one coat of a jelly I frankened for the occasion. I mixed a few drops of Essence - Gel-Look topcoat with one drop of China Glaze - Entourage. On it's own Entourage was just too opaque so I thinned it down with the clear topcoat.

 
I like this look but I still prefer shiny glitter :)

 
Check out the (way better) jelly sandwiches from the other Artsy Wednesday contributors:


Wednesday, 14 November 2012

Artsy Wednedsay - Drag Marble

One of the great things about being a part of the Artsy Wednesday group is being pushed to try techniques you'd usually avoid because they seem a bit difficult. Also, it gives me another excuse to play with my polishes.

This week we are trying out drag marbling. I used Cult - Vicious and Models Own - Lilac Dream to create my mani. I painted a thick coat of each colour onto half of a nail, then swirled with a toothpick until I was happy with the effect. I think it turned out alright but I probably won't try this again.


Check out the marbled manis from the other contributors to Artsy Wednesday
 

Wednesday, 7 November 2012

Artsy Wednesday - Creative Crackle

When I saw the theme for this week I was a bit dismayed. Crackle?! oh no. I'm really not a fan of crackle nail polish. I have a bottle that I've used once and then never had the desire to use again. Creative for me is actually using my crackle polish.

In the spirit of making the best of things and not neglecting even the unloved polishes my stash I got 'cracking' and created a pastel rainbow underneath black crackle. It's not really that creative but it's the best I could do.

I'm sure all the other bloggers did a way better job than I did today. Check out their creative crackle manis.


Wednesday, 31 October 2012

Artsy Wednesday - Halloween Nails

I am a big fan of the supernatural genre. TV, movies, books, I love them all. There's a lot of vampire based offerings around at the moment and I've based my Halloween mani on that theme.


Dripping blood, a scary red iris, puncture wounds and a bloody fang.

I'm pretty pleased with how this turned out and I'm keen to give the dripping blood and the eyeball another try in the future.

I'm really looking forward to seeing what awesome manis the other Artsy Wednesday girls came up with. Check them out!


Wednesday, 24 October 2012

Artsy Wednesday - Cling Wrap Nails

I am very excited to be joining the Artsy Wednesday group this week! I enquired about joining a month or so ago and was put on their waiting list. Last week I got the good news that there's a space available. Yay! I'm very excited to be on board with this great bunch of nail bloggers.

Every week each member of the group posts a manicure based around a set theme. This week we are doing Cling wrap/Saran wrap/plastic wrap manicures. Here is mine.

 
I have never tried this technique before. I spent a bit of time looking at tutorials and discovered that there are a few different methods. I experimented a bit and settled on the following:

1. Apply base colour. I used Chi Chi - Show Me The Money, a dark metallic green.


2. I couldn't help myself and so I added a coat of Kleancolor - Sugarcoat.

3. Allow to dry completely.

4. Scrunch a bit of cling wrap into a loose ball, making sure there are some interesting looking folds.

5. Paint your secondary colour roughly onto a section of the cling wrap. I used Models Own - Golden Green.

6. Splodge it onto a bit of paper to remove excess polish.

7. Splodge artistically onto your nail.

8. Apply topcoat.

9. Admire :)
I love the way the glitter peeks through.


Thanks for welcoming me on board ladies!

Check out posts from the other Artsy Wednesday contributors!


Monday, 1 October 2012

Polish Us Pink: Cherry Blossoms


This month I've decided to take part in Polish Us Pink, a group of bloggers and polish addicts trying to raise awareness for breast cancer. Each Monday in October we'll post pink manicures.


October is breast cancer awareness month both here in Australia and in places around the world. To learn more about breast cancer or to see how you can help visit the National Breast Cancer Foundation website.

Helping can be as easy as buying pink themed products from participating partners. A list is here.

Or you can host a fundraising event. Get some helpful hints here.


Today I've created a pink cherry blossom manicure. I used Essie - French Affair as a base then painted some branches on with China Glaze - Wagon Trail and a fine brush. Then I used Rimmel - Strawberry Fizz and a small dotting tool for the petals and Ulta3 - Sunset Pink for the middle of the blossoms.

I've never tried this before and I think it turned out pretty well. What do you think?

You can jump to other bloggers posts using the links below or join Polish Us Pink by signing up on The Subtle Shimmer blog page.

Saturday, 29 September 2012

Nail Art - Purple Waves

I got the idea for this design from a blog that I thought I saved to my favourites and now can't find. I've googled and googled and can't see the tutorial pictures that inspired me anywhere. If YOU know where to find pictures of manicures that look similar to this one please leave a message in the comments section. Please don't leave a link, just the name of the blog where you found the pictures.

That said, I love this manicure! It was surprisingly easy to do and looks great!

I started with two coats of Face Shop - pale lilac. For anyone reading this from Sydney there is now a Faceshop store on Hurstville Westfields. Polishes start at $3.

After the base colour dried I added a diagonal strip of Zoya - Julieanne. I needed two coats for good coverage.

I then used small and medium dotting tools to add the wavy bits. If anyone is interested in a tutorial just let me know and I'll be happy to create one.

What do you think of this pattern?

Thursday, 27 September 2012

Nail Art - Cupcake nails

I did this manicure while I was waiting for the Models Own 50% Off Sale to go live. They currently have almost everything in their store at half price!

I may have bought a 'few' polishes.

I started here with a my Sunshine Gradient as a base, painted mid purple on the tips, then freehanded the 'icing' in white. I used a fine brush and some dark purple for the stripes and a dotting tool for the .... dots.

I didn't use a topcoat. I tried, but got some pretty bad streaking from the dark purple, even when I let my polish dry for a good hour. You can see it a little on my index finger.

I think this is a very cute manicure and would also look good as an accent nail. What do you think?

I appreciate any feedback on my blog. Please feel free to comment below.

Wednesday, 26 September 2012

Nail Art - Sunshine Yellow Gradient

I've recently bought a few yellow polishes. Before purchasing them I thought that yellow wasn't for me but after giving them a go I have changed my mind. Such a happy, warm colour.

Today I've created a yellow gradient by using Essence - Wanna Be Your Sunshine as a base. Then I sponged Rimmel - Lemon Drop about halfway up the nail and then China Glaze - Snow on the tips. Top coat with Cult Nails - Wicked Fast.

I really like the way this turned out.

What do you think?

I encourage any geniune comments, I love to hear from you! Please feel free to follow my blog here or on Bloglovin.

Thursday, 13 September 2012

Nail art - French Tips

I recently bought this dark grey creme and thought it might look nice paired with a bright colour. When I started looking through my nail wheels there were so many colours that looked great with the grey that I had trouble deciding which one to use.

Two coats of Rimmel - Man Overboard

I freehand painted the tips with one coat of China Glaze - Sky Hightop, which was easier than I expected. I would have used tip tapes but I didn't have any.

Sealed it all with a generous coat of Out The Door topcoat.

I've had a bunch of compliments on this mani and I personally love it! It's not very 'spring' but it is gorgeous.

I'll be trying this again in a variety of colours.

Monday, 3 September 2012

Nail Art - Blue Dot Gradient

It's been a little while since I posted anything. I've worn a few lovely manicures but I have been having NO luck photographing them.

Tonight I've done a blue dot gradient.

Base coat:
China Glaze - Snow

Dots (darkest to lightest):
NYC - Rhythm n Blues
China Glaze - Sky High-top
Chi Chi - Boys Boys Boys

Such a fun combination.

Sunday, 19 August 2012

Nail Art - Green and Copper Striping tape

I'm trying to branch out a little with my nail art. I figure that if I don't practice and try new things I'll never get any better. So today I've tried a manicure with striping tape. I bought a bunch of different colours on EBay recently and this seemed like a great opportunity to try them out.

This is what I did:

Apply base coat and colour. Base - Nail Tek II. Colour - Essence Viva La Green.
Allow to thoroughly dry.
Apply tape ( I use low tack decorators tape ) then apply contrasting colour. Tip colour - Ulta3 Antique Copper.  Carefully peel off tape before contrast colour dries.
Allow to thoroughly dry.
Apply striping tape in desired pattern, pressing down firmly. Use scissors to trim tape to size.
Top coat - Out the Door.

I like how this turned out. I'll definitely use striping tape again.

What do you think?

Please feel free to comment or follow me. I'd love to hear from other lacquered lunatics.


Saturday, 11 August 2012

Nail Art - Water Marbling Rainbow

There are plenty of tutorials out there on water marbling. It's not a hard technique but it is also not easy to get the beautiful results you see online. It's also a fairly time consuming exercise. I attempted this on four nails but only got a satisfactory result on one so I painted the others in rainbow skittles.

The colors I used here are:
OPI: Red Light District
China Glaze:
Breakin
Happy Go Lucky
Entourage
Sky High-Tops

Sorry about the cuticles/fingers. I should have washed the acetone off before I took the picture.


Saturday, 4 August 2012

Nail Art - Newsprint Nails

Newsprint nails. So simple. Even nail art noobs like me can do it!

First, assemble your supplies:
Base colour (I used Essence - Got A Secret)
Top coat
Shot glass
Alcohol (I used medical grade methylated spirits, but rubbing alcohol or vodka also apparently work well)
Newspaper, cut into bits big enough to cover your nail.


Apply base colour and allow to dry thoroughly.

Dip nail in shot glass half filled with alcohol for 10 seconds or so.

While nail is still wet press newspaper, print side down onto nail. Press firmly, so that the ink transfers well to nail.

Peel newspaper off carefully.

When dry gently apply topcoat.

Clean up.

Admire nails.

Additional step:
Post about it on your blog/Facebook/twitter etc. Or comment here. I'd love to know if anyone gives it a go (or actually reads my posts).

Saturday, 21 July 2012

MASH goodies

Recently I bought some bits n pieces from the MASH website.

I got:
Stamping plates 25-50.
I've been enjoying testing these out, and I did a cloud manicure here. I'm still hopeless at stamping though.

Stamping polish in black and white.
What is the difference between regular polish and stamping polish anyway?

Dotting tools in a variety of sizes.
Can't wait to use these. I'm inspired by Pretty Purple Polish and Lab Muffin and their recent dotty manicures.

Glass nail file.
I tried this today and it does seem gentler on my nails. A bit slower to file them to shape, but if it means less breakage it's all good.

Initially I had a slight issue with only part of my order getting delivered. This was cleared up with one email and the rest of my order shipped just as quickly as the first bit. MASH has great customer service. I would definitely buy from them again.

Check their site out here.

MASH stamping plates, dotting tools, glass nail file, stamping polishes

Nail Art - Dotty Gradient

I was inspired to do this manicure by the blog Pretty Purple Polish. The dotty manicure there was so pretty, I had to try something similar.

I used a base coat of China Glaze - Snow and topped it with dots in a sort of gradient. I used (in order of light to dark) OPI - Red Light District, Essence - Fateful Desire and China Glaze - Smoke and Ashes. I used 3 sizes of dotting tool from my new MASH set.

When I put the topcoat on I unfortunately got a little bit of streaking.

I love it!

Tuesday, 17 July 2012

Nail Art - Polka Dot Pink

I'm not very good at nail art. I see so many beautiful pics of amazing nails and think, I could never do that. I can however, put spots on my nails. Sometimes it looks great, other times meh. I'm not sure about this effort

OPI - Kiss Me On My Tulips topped with Essie - Over The Top

Polka Dot Nails, OPI - Kiss Me On My Tulips, Essie - Over The Top